
To make a wedge
/We'll need a wavelet like the one we made last time. We could import it, if we've made one, but SciPy also has one so we can save ourselves the trouble. Remember to put %pylab inline at the top if using IPython notebook.
import numpy as npfrom scipy.signal import rickerimport matplotlib.pyplot as plt
Now we need to make a physical earth model with three rock layers. In this example, let's make an acoustic impedance earth model. To keep it simple, let's define the earth model with two-way-travel time along the vertical axis (as opposed to depth). There are number of ways you could describe a wedge using math, and you could probably come up with a way that is better than mine. Here's a way:
nsamps, ntraces = [600, 500]
rock_names = ['shale 1', 'sand', 'shale 2']
rock_grid = np.zeros((n_samples, n_traces))

def make_wedge(n_samples, n_traces, layer_1_thickness, start_wedge, end_wedge):
    for j in np.arange(n_traces):
        for i in np.arange(n_samples):
            if i <= layer_1_thickness:
                rock_grid[i][j] = 1
            if i > layer_1_thickness:
                rock_grid[i][j] = 3
                if j >= start_wedge and i - layer_1_thickness < j-start_wedge:
                    rock_grid[i][j] = 2
                    if j >= end_wedge and i > layer_1_thickness+(end_wedge-start_wedge):
                        rock_grid[i][j] = 3
    return rock_grid
Let's insert some numbers into our wedge function and make a particular geometry.
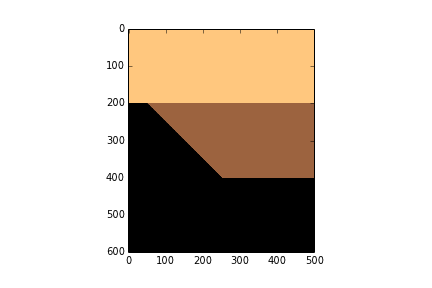
layer_1_thickness = 200
start_wedge = 50
end_wedge = 250
rock_grid = make_wedge(n_samples, n_traces,
            layer_1_thickness, start_wedge,
            end_wedge)

plt.imshow(rock_grid, cmap='copper_r')
Now we can give each layer in the wedge properties.
vp = np.array([3300., 3200., 3300.])
rho = np.array([2600., 2550., 2650.])
AI = vp*rho
AI = AI / 10e6 # re-scale (optional step)
Then assign values assign them accordingly to every sample in the rock model.
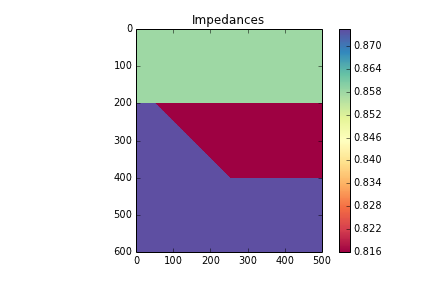
model = np.copy(rock_grid)
model[rock_grid == 1] = AI[0]
model[rock_grid == 2] = AI[1]
model[rock_grid == 3] = AI[2]
plt.imshow(model, cmap='Spectral')
plt.colorbar()
plt.title('Impedances')
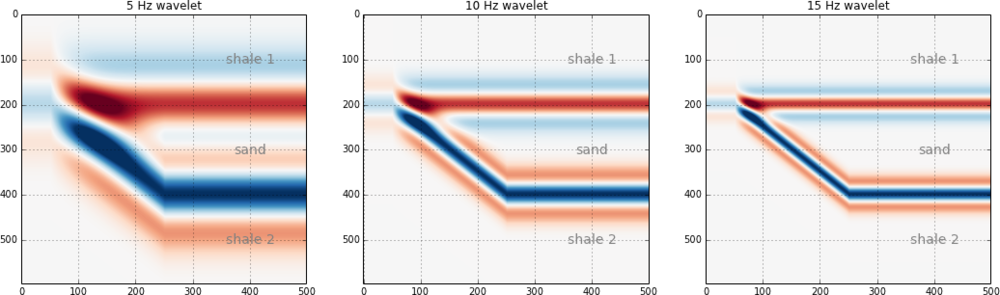
Now we can compute the reflection coefficients. I have left out a plot of the reflection coefficients, but you can check it out in the full version in the nbviewer
upper = model[:-1][:]
lower = model[1:][:]
rc = (lower - upper) / (lower + upper)
maxrc = abs(np.amax(rc))
Now we make the wavelet interact with the model using convolution. The convolution function already exists in the SciPy signal library, so we can just import it.
from scipy.signal import convolve
def make_synth(f):
    synth = np.zeros((n_samples+len(t)-2, n_traces))
    wavelet = ricker(512, 1e3/(4.*f))
    wavelet = wavelet / max(wavelet)   # normalize
    for k in range(n_traces):
        synth[:,k] = convolve(rc[:,k], wavelet)
    synth = synth[ np.ceil(len(wavelet))/2 : -np.ceil(len(wavelet))/2, : ]
    return synth
Finally, we plot the results.
frequencies = array([5, 10, 15])
plt.figure(figsize = (15, 4))
for i in np.arange(len(frequencies)):
    this_plot = make_synth(frequencies[i])
    plt.subplot(1, len(frequencies), i+1)
    plt.imshow(this_plot, cmap='RdBu', vmax=maxrc, vmin=-maxrc, aspect=1)
    plt.title( '%d Hz wavelet' % freqs[i] )
    plt.grid()
    plt.axis('tight')

    # Add some labels
    for i, names in enumerate(rock_names):
        plt.text(400, 100+((end_wedge-start_wedge)*i+1), names,
                 fontsize=14, color='gray',
                 horizontalalignment='center',
                 verticalalignment='center')
That's it. As you can see, the marriage of building mathematical functions and plotting them can be a really powerful tool you can apply to almost any physical problem you happen to find yourself working on.
You can access the full version in the nbviewer. It has a few more figures than what is shown in this post.
A day of geocomputing
I will be in Calgary in the new year and running a one-day version of this new course. To start building your own tools, pick a date and sign up:


 Except where noted, this content is licensed