More ways to make models

A few weeks ago I wrote about a new feature in bruges for making wedge models. This new feature makes it really easy to make wedge models, for example:

 
import bruges as bg import matplotlib.pyplot as plt strat = [(0, 1, 0), (2, 3, 2, 3, 2), (4, 5, 4)] wedge, *_ = bg.models.wedge(strat=strat, conformance=’top’) plt.imshow(wedge)

And here are some examples of what this will produce, depending on the conformance argument:
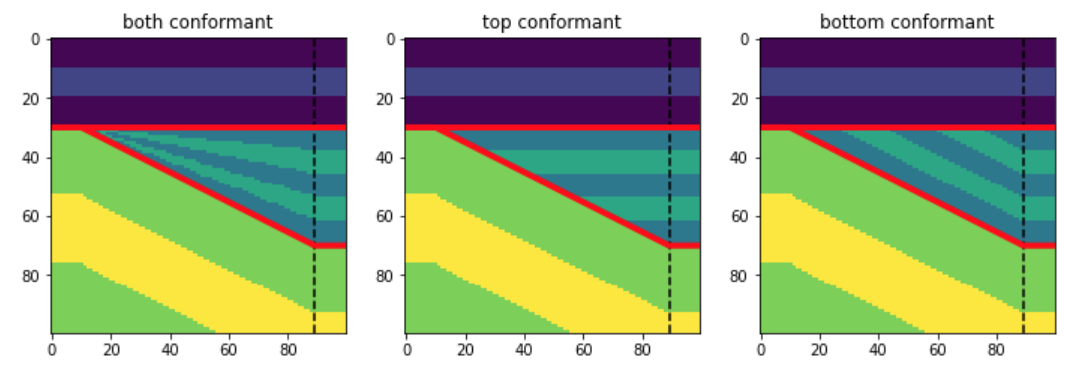
wedge_conformance.png

What’s new

I thought it might be interesting to be able to add another dimension to the wedge model — in and out of the screen in the models shown above. In that new dimension — as long as there are only two rock types in there — we could vary the “net:gross” of the wedge.

So if we have two rock types in the wedge, let’s say 2 and 3 as in the wedges shown above, we’ll end up with a lot of different wedges. At one end of the new dimension, we’ll have a wedge that is all 2. At the other end, it’ll be all 3. And in between, there’ll be a mixture of 2 and 3, with the layers interfingering in a geometrically symmetric way.

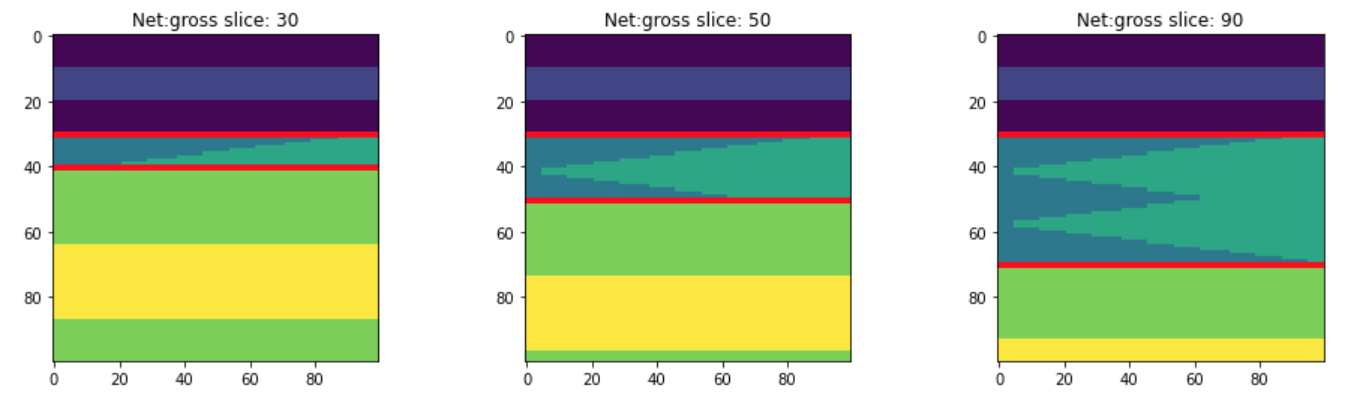
Let’s look at those 3 slices in the central model shown above:

bruges_wedge_slices.png

We can also see slices in that other dimension, to visualize the net:gross variance across the model. These slices are near the thin end of the wedge, the middle, and the thick end:

bruges_netgross_slices.png

To get 3D wedge models like this, just make a binary (2-component) wedge and add breadth=100 (the number of slices in the new dimension).

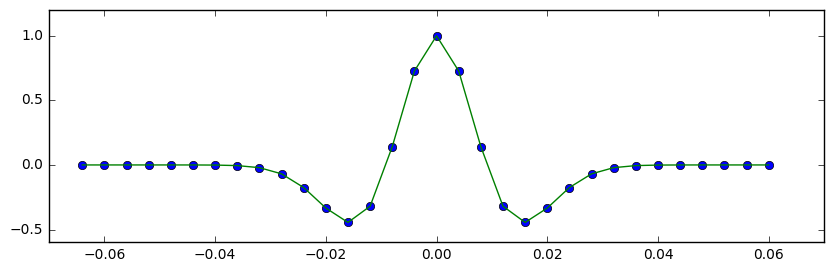
These models are admittedly a little mind-bending. Here’s what slices in all 3 orthogonal directions look like, along with (very badly) simulated seismic through this 3D wedge model:

bruges_all_the_slices.png

New wedge shapes!

As well as the net-to-gross thing, I added some new wedge shapes, so now you can have some steep-sided alternatives to the linear and sigmoidal ramps I had in there originally. In fact, you can pass in a wedge shape function of your own, so there’s no end to what you could implement.

bruges_new_wedge_shapes.png

You can read about these new features in this notebook. Please note that you will need the latest version of bruges to use these new features, so run pip install —upgrade bruges in your environment, then you’ll be all set. Share your models, I’d love to see what you make!

What is a sprint?

In October we're hosting our first 'code sprint'! What is that?

A code sprint is a type of hackathon, in which efforts are focused around a small number of open source projects. They are related to, but not really the same as, sprints in the Scrum software development framework. They are non-competitive — the only goal is to improve the software in question, whether it's adding functionality, fixing bugs, writing tests, improving documentation, or doing any of the other countless things that good software needs. 

On 13 and 14 October, we'll be hacking on 3 projects:

  • Devito: a high-level finite difference library for Python. Devito featured in three Geophysical Tutorials at the end of 2017 and beginning of 2018 (see Witte et al. for Part 3). The project needs help with code, tests, model examples, and documentation. There will be core devs from the project at the sprint. GitHub repo is here.
  • Bruges: a simple collection of Python functions representing basic geophysical equations. We built this library back in 2015, and have been chipping away ever since. It needs more equations, better docs, and better tests — and the project is basic enough for anyone to contribute to it, even a total Python newbie. GitHub repo is here.
  • G3.js: a JavaScript wrapper for D3.js, a popular plotting toolkit for web developers. When we tried to adapt D3.js to geoscience data, we found we wanted to simplify basic tasks like making vertical plots, and plotting raster-like data (e.g. seismic) with line plots on top (e.g. horizons). Experience with JavaScript is a must. GitHub repo is here.

The sprint will be at a small joint called MAZ Café Con Leche, located in Santa Ana about 10 km or 15 minutes from the Anaheim Convention Center where the SEG Annual Meeting is happening the following week.

Thank you, as ever, to our fantastic sponsors: Dell EMC and Enthought. These two companies are powered by amazing people doing amazing things. I'm very grateful to them both for being such enthusiastic champions of the change we're working for in our science and our industry. 

If you like the sound of spending the weekend coding, talking geophysics, and enjoying the best coffee in southern California, please join us at the Geophysics Sprint! Register on Eventbrite and we'll see you there.

Easier, better, faster, stronger

bruges_preview_1.png

Yesterday I pushed a new release of bruges to Python's main package repository, PyPi.  Version 0.3.3 might not sound like an especially auspicious version perhaps, but I'm excited about the new things we've added recently. It has come a long way since we announced it back in 2015, so if you haven't checked it out lately, now's a good time to take another look.

What is bruges again?

Bruges is a...

In other words, nothing fancy — just equations. It is free, open source software. It's aimed at geophysicists who use Python.

How do you install it? The short answer is pip:

    pip install bruges

So what's new?

Here are the highlights of what's been improved and added in the last few months:

  • The reflectivity equations in reflection module now work on arrays for the Vp, Vs, and rho values, as well as the theta values. This is about 10 times faster than running a loop over elements; the Zoeppritz solution is 100× faster.
  • The various Zoeppritz solutions and the Aki–Richards approximations now return the complex reflectivity and therefore show post-critical amplitudes correctly.
  • A new reflection coefficient series function, reflection.reflectivity(), makes it easier to compute offset reflectivities from logs.
  • Several new linear and non-linear filters are in bruges.filters, including median (good for seismic horizons), mode (good for waveform classification), symmetric nearest-neighbours or snn, and kuwahara.
  • The wavelets ricker(), sweep() (aka Klauder) and ormsby() wavelet now all work for a sequence of frequencies, returning a wavelet bank. Also added a sinc() wavelet, with a taper option to attenuate the sidelobes.
  • Added inverse_gardner, and other density and velocity transforms, to petrophysics.
  • Added transform.v_rms() (RMS velocity), transform.v_avg() (average velocity) and transform.v_bac() (naïve Backus average). These all operate in a 'cumulative' average-down-to sense.
  • Added a coordinate transformation to translate between arbitrarily oriented (x,y) and (inline, line) coordinates.

Want to try using it right now, with no installation? Give it a spin in My Binder! See how easy it is to compute elastic moduli, or offset reflection coefficients, or convert a log to time.  

bruges_preview_2.png

Want to support the development of open source geophysics software? Here's how:

  • Use it! This is the main thing we care about.
  • Report problems on the project's Issue page.
  • Fork the project and make your own changes, then share them back.
  • Pay us for the development of functionality you need.

x lines of Python: Let's play golf!

Normally in the x lines of Python series, I'm trying to do something useful in as few lines of code as possible, but — and this is important — without sacrificing clarity. Code golf, on the other hand, tries solely to minimize the number of characters used, and to heck with clarity. This might, and probably will, result in rather obfuscated code.

So today in x lines, we set x = 1 and see what kind of geophysics we can express. Follow along in the accompanying notebook if you like.

A Ricker wavelet

One of the basic building blocks of signal processing and therefore geophysics, the Ricker wavelet is a compact, pulse-like signal, often employed as a source in simulation of seismic and ground-penetrating radar problems. Here's the equation for the Ricker wavelet:

$$ A = (1-2 \pi^2 f^2 t^2) e^{-\pi^2 f^2 t^2} $$

where \(A\) is the amplitude at time \(t\), and \(f\) is the centre frequency of the wavelet. Here's one way to translate this into Python, more or less as expressed on SubSurfWiki:

import numpy as np 
def ricker(length, dt, f):
    """Ricker wavelet at frequency f Hz, length and dt in seconds.
    """
    t = np.arange(-length/2, length/2, dt)
    y = (1.0 - 2.0*(np.pi**2)*(f**2)*(t**2)) * np.exp(-(np.pi**2)*(f**2)*(t**2))
    return t, y

That is alredy pretty terse at 261 characters, but there are lots of obvious ways, and some non-obvious ways, to reduce it. We can get rid of the docstring (the long comment explaining what the function does) for a start. And use the shortest possible variable names. Then we can exploit the redundancy in the repeated appearance of \(\pi^2f^2t^2\)... eventually, we get to:

def r(l,d,f):import numpy as n;t=n.arange(-l/2,l/2,d);k=(n.pi*f*t)**2;return t,(1-2*k)/n.exp(k)

This weighs in at just 95 characters. Not a bad reduction from 261, and it's even not too hard to read. In the notebook accompanying this post, I check its output against the version in our geophysics package bruges, and it's legit:

The 95-character Ricker wavelet in green, with the points computed by the function in BRuges.

The 95-character Ricker wavelet in green, with the points computed by the function in BRuges.

What else can we do?

In the notebook for this post, I run through some more algorithms for which I have unit-tested examples in bruges:

To give you some idea of why we don't normally code like this, here's what the Aki–Richards solution looks like:

def r(a,c,e,b,d,f,t):import numpy as n;w=f-e;x=f+e;y=d+c;p=n.pi*t/180;s=n.sin(p);return w/x-(y/a)**2*w/x*s**2+(b-a)/(b+a)/n.cos((p+n.arcsin(b/a*s))/2)**2-(y/a)**2*(2*(d-c)/y)*s**2

A bit hard to debug! But there is still some point to all this — I've found I've had to really understand Python's order of mathematical operations, and find different ways of doing familiar things. Playing code golf also makes you think differently about repetition and redundancy. All good food for developing the programming brain.

Do have a play with the notebook, which you can even run in Microsoft Azure, right in your browser! Give it a try. (You'll need an account to do this. Create one for free.)


Many thanks to Jesper Dramsch and Ari Hartikainen for helping get my head into the right frame of mind for this silliness!

x lines of Python: AVO plot

Amplitude vs offset (or, more properly, angle) analysis is a core component of quantitative interpretation. The AVO method is based on the fact that the reflectivity of a geological interface does not depend only on the acoustic rock properties (velocity and density) on both sides of the interface, but also on the angle of the incident ray. Happily, this angular reflectivity encodes elastic rock property information. Long story short: AVO is awesome.

As you may know, I'm a big fan of forward modeling — predicting the seismic response of an earth model. So let's model the response the interface between a very simple model of only two rock layers. And we'll do it in only a few lines of Python. The workflow is straightforward:

  1. Define the properties of a model shale; this will be the upper layer.
  2. Define a model sandstone with brine in its pores; this will be the lower layer.
  3. Define a gas-saturated sand for comparison with the wet sand. 
  4. Define a range of angles to calculate the response at.
  5. Calculate the brine sand's response at the interface, given the rock properties and the angle range.
  6. For comparison, calculate the gas sand's response with the same parameters.
  7. Plot the brine case.
  8. Plot the gas case.
  9. Add a legend to the plot.

That's it — nine lines! Here's the result:


Once we have rock properties, the key bit is in the middle:

    θ = range(0, 31)
    shuey = bruges.reflection.shuey2(vp0, vs0, ρ0, vp1, vs1, ρ1, θ)

shuey2 is one of the many functions in bruges — here it provides the two-term Shuey approximation, but it contains lots of other useful equations. Virtually everything else in our AVO plotting routine is just accounting and plotting.


As in all these posts, you can follow along with the code in the Jupyter Notebook. You can view this on GitHub, or run it yourself in the increasingly flaky MyBinder (which is down at the time of writing... I'm working on an alternative).

What would you like to see in x lines of Python? Requests welcome!