The machine learning algo zoo

One of the wonderful, but also baffling, things about machine learning is that there are so many ways to do it. At some very high level, most of them do something like this (highlighting some jargon):

  1. The human settles on a task (“Predict lithology”) and finds a bunch of data relevant to that task (say, some well logs A, B, and C). Then the human has to come up with some known instances or examples where these well log data go with those lithology labels.

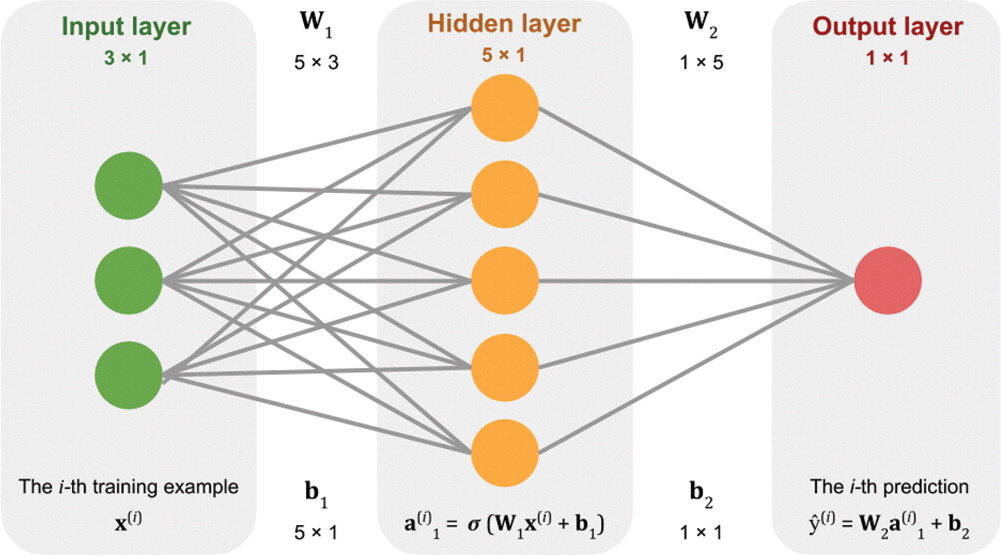
  2. Stuff the logs into an equation. Not an equation like A + B + C, because there’s nothing to tweak in that equation. The equation needs parameters or coefficients, like \(\alpha A + \beta B + \gamma C\). The machine can tweak those Greek letters to change the output. At first, they’ll be random guesses.

  3. See how the output of that equation, which is the machine’s prediction, compares to the known labels. Come up with another equation whose output is a good measure of how far away the predictions are from the known labels. This distance is called the cost, and the equation to compute it the cost function.

  4. Now that the machine has something to guess (the Greek parameters) and a way to know how well its doing (the cost function), it just needs a way to minimize the cost, or to put it another way, optimize the parameters. This optimization process is called learning.

Together, these steps constitute a learning algorithm. An algorithm with a set of optimized weights is usually referred to simply as a model.

All the algorithms

Every piece of this story is worth a whole blog post on its own, but for today let’s stay high-level.

The problem is that the algorithm zoo can be overwhelming. My post last week was an attempt to compare a lot of regression algorithms, in terms of how they make sense of three synthetic datasets.

Today I’m sharing a Big Giant Spreadsheet™ that attempts to compare some of the most popular ‘shallow’ learning algorithms in terms of their most important characteristics. For example, can they predict probabilities? Are they deterministic? What are the key hyperparameters? And so on.

Here’s a small version of the table (see the links below for other versions):

There’s a PDF version here — and here’s the original spreadsheet.

Eventually, I’m visualizing a poster for the wall. I think it would be nice to have some equations on here. Maybe the plots from the various comparisons too (see last weeks post!). And even more advice, like which ones break when you have too many features. What else would you like to see on there?

Take one, make one

There’s a teaching method originating in medicine known as “see one, do one, teach one”. I like it because it underscores hands-on practice and knowledge sharing as essential steps in developing a craft — and it works. Today, I want to urge you to take a challenge, then make one for others.

First, what’s the challenge?

A couple of years ago, inspired by the annual Advent of Code challenges, we introduced the kata, a set of coding challenges especially for geoscientists. For a long time we sent them to students in our Geocomputing class, to encourage them to keep coding. Now we just tell everyone about them.

At the time we announced the kata, there were five puzzles. Today, there are 11: four beginner-friendly challenges, four intermediate ones, and three quite hard ones. Topics range from data munging to map indexing, and from digital elevation models to fractures.

💡 If you want to try one, this Colab is the easiest way to get started: https://ageo.co/kata-live

Now make one!

Once you’ve got an idea of how these things work, you might want to try your hand at making one. Once you have an idea for a short task, you need a way to generate a random dataset. For example, for the sample-names challenge, I have a function that generates a random set of sample names, composed of several parts (a number, a basin, a formation, a data, etc).

When you have a dataset, you can ask some questions about it. Start with an one, and build from there. The last question (there can be 3 or 4), should be a somewhat realistic challenge for this kind of data. Each question needs a hint, and each question must have only one possible answer (this is the tricky bit!).

If you fancy trying your hand at it, check out our new kata-dev repository on GitHub. There is a demo challenge there, which is also live on the kata server, so you can see how it all works. Good luck!


Whether or not you try making a challenge for your peers, so let us know how you get on in the #kata-challenges channel on the Software Underground. We’re always ready to answer questions about them.

Why do wavelets have sidelobes?

Brian Romans (a geology professor at Virginia Tech) asked a great question in the Software Underground’s Slack earlier this month:

I was teaching my Seismic Stratigrapher course the other day and a student asked me about the origin of ‘side lobes’ on the Ricker wavelet. I didn’t have a great answer [...] what is a succinct explanation for the side lobes?

Questions like this are fantastic because they really aren’t easy to answer. There’s usually a breadcrumb trail of concepts that lead to an answer, but the trail might be difficult to navigate, and some of those breadcrumbs will lead to more questions… and soon you’ve written a textbook on signal processing.

Here’s how I attempted, rather long-windedly, to help Brian’s student (edited a bit for brevity):

Wavelets measure displacement, or velocity, or acceleration (or some proxy for these things like voltage or capacitance), but eventually we can compute a signal that represents displacement. (In seismic reflection surveys, we don't care about the units.)

The Ricker wavelet represents an impulsive signal (the 'bang' of dynamite or the 'pop' of an airgun; let's leave Vibroseis out of it for now). The impulse is bandlimited ('band' as in radio band) — in other words, it doesn't contain all frequencies. Unfortunately, you need a lot of frequencies to represent very sudden or abrupt (short in time) things like bangs and pops, otherwise they spread out in time. Since our wavelet is restricted to a band of frequencies (eg 10 to 80 Hz), it must be (infinitely) spread out in time.

Additionally, since the frequencies don't contain what we call a 'DC' signal (0 Hz, in other words a bias or shift), it must return to zero when displaced. So it starts and ends on zero amplitude.

So the wavelet is spread out, and it starts and ends on zero amplitude. Why does it wiggle? In other words, why is seismic oscillatory? It's not the geophone: although it contains a spring (or something like one), its specially chosen/tuned to be able to move freely at the frequencies we're trying to record. So it's the stiffness of the earth itself which causes the oscillation, dissipating the vibrational energy (as heat) and damping the signal. At least, this explains why it dies out, but not really why it oscillates... Physics! Simple harmonic motion! Or something.

Yeah, I guess I’m a bit hazy on the micro-mechanics of wave propagation. Evan came to my rescue (see below), but I had a couple more things to say first:

The other thing is that classic wavelets like the Ricker are noncausal, aka non-realizable, because they have energy at negative time (i.e. they are centered around t = 0) and there’s no such thing as negative time. This is a clue that a zero-phase wavelet is a geological convenience contrived during processing, not a physical thing. The field seismic data would contain a so-called 'minimum phase' wavelet, which looks more like what you'd expect a recording of a dynamite blast to look like (see below).

To try to make up for the fact that I trailed off at ‘simple harmonic motion’, Evan offered this:

If you imagine the medium being made up of a bunch of particles, then propagating a wave means causing a stress (say, sudden compression at the surface) and then stretching and squeezing those particles to accommodate that stress. A compression (which we may measure or draw as a peak) does not come without a stretching (a dilation or trough) of particles on either side. So a side lobe (or a dilation) has to exist in a way: the particles are connected together and stretch and squeeze when they feel pressure.

Choice of wavelet matters

There was more from Doug McClymont, who’s always up for some chat about wavelets. He pointed out that although high-bandwidth Ormsby wavelets have more sidelobes, they generally have lower amplitudes than a Ricker wavelet, whose sidelobes always have the same ampitude (exactly \( 2 \mathrm{e}^{-3/2} \)). He added:

I tend not to use Ricker wavelets for very much as you can't control the bandwidth of them (just the peak frequency) so they tend to be very narrow-band and have quite high (and constant) amplitude side lobes. As I work a lot with broadband seismic data I use Ormsby wavelets much more for any well-ties and seismic modelling.

Good reasons to use an Ormsby wavelet as your analaytic wavelet of choice! Check out this other post all about Ormsby wavelets and how to make them.

What do you think? Do you have an intuitive explanation for why wavelets have sidelobes? Ideally shorter than mine!

Rocks in the Playground

It’s debatable whether neural networks should feature in an introductory course on machine learning. But it’s hard to avoid at least mentioning them, and many people are attracted to machine learning courses because they have heard so much about deep learning. So, reluctantly, we almost always get into neural nets in our Machine learning for geoscientists classes.

Our approach is to build a neural network from scratch, using only standard Python and NumPy data structures — that is, without using a specialist deep-learning framework. The code is all adapted from Gram Ganssle’s awesome Leading Edge tutorial from 2018. I like it because it lays out the components — the data, the activation function, the cost function, the forward pass, and all the steps involved in backpropagation — then combines them into a working neural network.

Figure 2 from Gram Ganssle’s 2018 tutorial in the Leading Edge. Licensed CC BY.

Figure 2 from Gram Ganssle’s 2018 tutorial in the Leading Edge. Licensed CC BY.

One drawback of our approach is that it would be quite fiddly to change some aspects of the network. For example, adding regularization, which almost all networks use, or even just adding another layer, are both beyond the scope of the class. So I like to follow it up with getting the students to build the same network using the scikit-learn library’s multilayer perceptron model. Then we build the same network using the PyTorch framework. (And one could do it in TensorFlow too, of course.) All of these libraries make it easier to play with the various options.

Introducing the Rocky Playground

Now we have another tool — one that makes it even easier to change parameters, add layers, use regularization, and so on. The students don’t even have to write any code! I invite you to play with it too — check out the Rocky Playground, an interactive deep neural network you can see inside.

Part of the user interface. Click on the image to visit the site.

Part of the user interface. Click on the image to visit the site.

This tool is a fork of Google’s well-known Neural Network Playground, as described at the bottom of our tool’s page. We made a few changes:

  • Added several new real and synthetic datasets, with descriptions.

  • There are more activation functions to try, including ELU and Swish.

  • You can change the regularization during training and watch the weights.

  • Anyone can upload their own dataset! (These stay on your computer, they are not uploaded anywhere.)

  • We added an the expression of the network in Python code.

One of the datasets we added is the same shear-sonic prediction dataset we use in the neural network class. So students can watch the same neural net they built (more or less) learn the task in real time. It’s really very cool.

I’ve written before about different expressions of mathematical ideas — words, symbols, annotations, code, etc. — and this is really just a natural extension of that thought. When people can hear and see the same idea in three — or five, or ten — different ways, it sticks. Or at least has a better chance of sticking.

What do you think? Do this tool help you? Could you use it for teaching? If you have suggestions feel free to drop them here in the comments, or submit an issue to the tool’s repo. We’d love your help to make it even more useful.

Illuminated equations

Last year I wrote a post about annotated equations, and why they are useful teaching tools. But I never shared all the cool examples people tweeted back, and some of them are too good not to share.

Let’s start with this one from Andrew Alexander that he uses to explain complex number notation:

illuminated_complex.png

Paige Bailey tweeted some examples of annotated equations and code from the reinforcement learning tutorial, Building a Powerful DQN in TensorFlow by Sebastian Theiler. Here’s one of the algorithms, with slightly muted annotations:

Illuminated_code_Theiler_edit.jpeg.png

Finally, Jesper Dramsch shared a new one today (and reminded me that I never finished this post). It links to Edward Raff’s book, Inside Deep Learning, which has some nice annotations, e.g. expressing a fundamental idea of machine learning:

Raff_cost_function.png

Dynamic explication

The annotations are nice, but it’s quite hard to fully explain an equation or algorithm in one shot like this. It’s easier to do, and easier to digest, over time, in a presentation. I remember a wonderful presentation by Ross Mitchell (then U of Calgary) at the also brilliant lunchtime mathematics lectures that Shell used to sponsor in Calgary. He unpeeled time-frequency analysis, especially the S transform, and I still think about his talk today.

What Ross understood is that the learner really wants to see the maths build, more or less from first principles. Here’s a nice example — admittedly in the non-ideal medium of Twitter: make sure you read the whole thread — from Darrel Francis, a cardiologist at Imperial Colege, London:

A video is even more dynamic of course. Josef Murad shared a video in which he derives the Navier–Stokes equation:

In this video, Grant Sanderson, perhaps the equation explainer nonpareil, unpacks the Fourier transform. He creeps up on the equation, starting instead with building the intuition around frequency decomposition:

If you’d like to try making this sort of thing, you might like to know that Sanderson’s Python software, manim, is open source.


Multi-modal explication

Sanderson illustrates nicely that the teacher has several pedagogic tools at their disposal:

  • The spoken word.

  • The written word, especially the paragraph describing a function.

  • A symbolic representation of the function.

  • A graphical representation of the function.

  • A code representation of the function, which might also have a docstring, which is a formal description of the code, its inputs, and its outputs. It might also produce the graphical representation.

  • Still other modes, e.g. pseudocode (see Theiler’s example, above), a cartoon (esssentially a ‘pseudofigure’),

Virtually all of these things are, or can be dynamic (in a video, on a whiteboard) and annotated. They approach the problem from different directions. The spoken and written descriptions should be rigorous and unambiguous, but this can make them clumsy. Symbolic maths can be useful to those that can read it, but authors must take care to define symbols properly and to be consistent. The code representation must be strict (assuming it works), but might be hard for non-programmers to parse. Figures help most people, but are more about building intuition than providing the detail you might need for implementation, say. So perhaps the best explanations have several modes of explication.

In this vein of multi-modal explication, Jeremy Howard shared a nice example from his book, Deep learning for coders, of combining text, symbolic maths, and code:

illuminated_jeremy_howard.png

Eventually I settled on calling these things, that go beyond mere annotation, illuminated equations (not to directly compare them to the beautiful works of devotion produced by monks in the 13th century, but that’s the general idea). I made an attempt to describe linear regression and the neural network equation (not sure what else to call it!) in a series of tweets last year. Here’s the all-in-one poster version (as a PDF):

linear_inversion_page.png

There’s nothing intuitive about physics, maths, or programming. The more tricks we have for spreading intuition about these important scientific tools, the better. I think there’s something in illuminated equations for teachers to practice — and students too. In fact, Jackie Caplan-Auerbach decribes coaching her students in creating ‘equation dictionaries’ in her geophysics classes. I think this is a wonderful idea.

If you’re teaching or learning maths, I’d love to hear your thoughts. Are these things worth the effort to produce? Do you have any favourite examples to share?

The deep time clock

Check out this video by a Finnish Lego engineer on the Brick Experiment Channel (BEC):

This brilliant, absurd machine — which fits easily on a coffee table — made me think about geological time.

Representing deep time is a classic teaching problem in geoscience. Most of them are variants of “Imagine the earth’s history compressed into 24 hours” and use a linear scale. It’s amazing how even the Cretaceous is only 25 minutes long, and humans arrived a few seconds ago. These memorable and effective demos have been blowing people’s minds for years.

Clocks with v e r y s l o w hands

I think an even nicer metaphor is the clock. Although non-linear, it’s instantly familiar, even if its inner workings of cogs and gears are not. We all understand how the hands move with different periods (especially if you’ve ever had a dull job). So this image (right) from the video is, I think, a nice lead-in to what ends up being a mind-exploding depiction of deep time, beyond anything you can do with a linear analogy.

Indeed, if the googol-gear-machine viking minifigure rotation was a day, the Cretaceous essentially doesn’t exist. Nothing does, it’s just 24 hours of protons decaying.

Screenshot from 2020-05-19 12-21-53.png

After a couple of giant gears, the engineer adds this chain of gears (below). Once attached to the rest of the machine, these things — the first 10 of them anyway — are essentially the hands on a geological clock.

geological_time_cogs.png

The first hand on this clock, so to speak, turns once every 4999 years. This is not a bad unit of measure if you’re looking at earth surface processes. Then each new gear multiplies by a factor of 40/8, so the next one is 25 ka, and the next 125 ka — around the domain of Milankovich cycles. Then things start getting really geological. The 5th clock hand does one rotation every 3.1 million years, then the 6th is 15.6 Ma. Unfortunately it quickly gets out of hand: the 10th has only turned once since the start of the universe, and after that they are all basically useless for thinking about anything but cosmological timelines. The last one here turns once every 95 petayears.

Remarkably, the BEC machine is still just getting started here. 95 Pa is nothing compared to the last wheel, which would require more energy than exists in the universe to turn. Think about that.

I want one of these

Apparently the BEC machine was inspired by a Daniel de Bruin creation:

Each wheel here is a 100:10 reduction. You’d only need the first 20 of them to have the last one do one single revolution since the birth of the solar system!

If someone would like to build such a geological clock for me, I’ll pay a sub-googol amount of money for it. Bonus points if it fits in a wristwatch.

Visual explanations of mathematics

It is thought that Euclid wrote Elements in about 300 BC, but Oliver Byrne turned it into one of the true gems of visualization — and made it about 100 times more readable. By seamlessly combining typeset text (Caslon, if you’re interested) with minimalist geometric drawings in primary colours, he didn’t just reproduce the text; he explained it in a new way.

annotated_byrne_euclid.png

If you like the look of it, it’s even cooler in Nicholas Rougeur’s beautiful interactive version.

This is a classic example of what Edward Tufte, the modern saint of visualization, calls a visual explanation (he wrote a whole book about the subject). We’ve written about the subject before (for example, see Evan’s 2014 post, Graphics that repay careful study). Figures and charts should do more than merely illustrate, they should elucidate.

Too often, equations — for example the myriad equations in any volume of GEOPHYSICS — do not elucidate. Indeed, they barely even illustrate. In some cases, it’s worse: they obfuscate. You might think mathematics is too dry, or too steeped in convention, for it to be any other way. Equations just are. But Byrne showed us that we can do better.

A few years ago, in an attempt to broaden my geophysical knowledge, I bought a copy of Daniel Fleisch’s book on Maxwell’s equations. It’s excellent, and the others in the series are good too. I especially liked the annotated equations; I’ve lightened the annotations in this version, to put them on a separate visual ‘layer’:

annotated_maxwell_by_fleisch.jpeg

In 2010, Randall Munroe of xkcd applied a similar strategy to label The Flake Equation, his parody of the Drake equation:

annotated_flake_equation.png

There are still other examples out there.

Later, I came across some lovely colourized equations by Stuart Riffle, a game developer. There was a bit of buzz about them on social media. Most people loved them, but a few pointed out that they suffer from the ‘legend lookup’ problem, and the colours he chose might not be great for colourblind people. Still, I like the concept — here’s the Fourier transform:

annotated_Fourier_Transform.png

Direct annotation, something Tufte always advocates, avoids the legend lookup problem. In his 2016 Geophysics Tutorial on finite volume methods, Rowan Cockett showed that colour and labels can work together:

annotated_equation_by_rowan_cockett.jpeg

And in his Observable post on the predator–prey interaction, modern visualization legend Mike Bostock avoids the problem entirely with the use of pictograms: direct representation of what the symbols represent:

annotated_predator_prey.png

Observable is interesting because the documents are runnable code. And this reminds us that mathematics — equations, data structures, and so on — has another expression: code. While symbolic representation speaks directly to some people, code speaks to others, probably more. Look at Randall Munroe’s annotation of a Wolfram Alpha equation (similar to an Excel formula) from his (wonderful) book, What If:

annotated_golf_xkcd.png

What I love about this is the direct path to exploring the function yourself. It would take me an hour to implement Fleisch’s electric field integral in code, even with the annotations. Typing in this — admittedly less useful — rocket golf equation will take me two minutes. Expressing mathematics in code is the ultimate explicit and practical expression of an idea.

We have lots of tools to write better mathematics: LaTeX, markdown, Jupyter Notebooks, and so on. But it feels like nothing has really converged yet. Technology that seamlessly mixes symbolic equations, illustrative-and-explicative annotation, and runnable code is, I am sure, not far off. Until then, we do the best we can with the tools we have.


Have you seen nice examples of annotated equations? I’d love to hear about them; let me know in the comments!


Don’t miss the follow-up post from 2021: Illuminated equations.


The work by Byrne is out of copyright. Those by Munroe and Cockett are openly licensed under Creative Commons. The work of Fleisch and Bostock are used in accordance with Fair Use doctrine.

Training digital scientists

Gulp. My first post in… a while. Life, work, chaos, ideas — it all caught up with me recently. I’ve missed the blog greatly, and felt a regular pang of guilt at letting it gather dust. But I’m back! The 200+ draft posts in my backlog ain’t gonna write themselves. Thank you for returning and reading this one.


Recently I wrote about our continuing adventures in training; since I wrote that post in April, we’ve taught another 166 people. It occurred to me that while teaching scientists to code, we’ve also learned a bit about how to teach, and I wanted to share that too. Perhaps you will be inspired to share your skills, and together we can have exponential impact.

Wanting to get better

As usual, it all started with not knowing how to do something, doing it anyway, then wanting to get better.

We started teaching in 2014 as rank amateurs, both as coders and as teachers. But we soon discovered the ‘teaching tech’ subculture among computational scientists. In particular, we found Greg Wilson and the Software Carpentry movement he started. By that point, it had been around for many, many years. Incredibly, Software Carpentry has helped more than 34,000 researchers ‘go digital’. The impact on science can’t be measured.

Eager as ever, we signed up for the instructor’s course. It was fantastic. The course, taught by Greg Wilson himself, perfectly modeled the thing it was offering to teach you: “Do what I say, and what I do”. This is, of course, critically important in all things, especially teaching. We accepted the content so completely that I’m not even sure we graduated. We just absorbed it and ran with it, no doubt corrupting it on the way. But it works for us.

What to read

TTT_rules.png

I should preface what follows by telling you that I haven’t taken any other courses on the subject of teaching. For all I know, there’s nothing new here. That said, I have never experienced a course like Greg Wilson’s, so either the methods he promotes are not widely known, or they’re widely ignored, or I’ve been really unlucky.

The easiest way to get Greg Wilson’s wisdom is probably to read his book-slash-website, Teaching Tech Together. (It’s free, but you can get a hard copy if you prefer.) It’s really good. You can get the vibe — and much of the most important advice — from the ten Teaching Tech Together rules laid out on the main page of that site (box, right).

As you can probably tell, most of it is about parking your ego, plus most of your knowledge (for now), and orientating everything — every single thing — around the learner.

If you want to go deeper, I also recommend reading the excellent, if rather academic, How Learning Works, by Susan Ambrose (Northeastern University) and others. It’s strongly research-driven, and contains a lot of great advice. In particular, it does a great job of listing the factors that motivate students to learn (and those that demotivate them), and spelling out the various ways in which students acquire mastery of a subject.

How to practice

It goes without saying that you’ll need to teach. A lot. Not surprisingly, we find we get much better if we teach several courses in a short period. If you’re diligent, take a lot of notes and study them before the next class, maybe it’s okay if a few weeks or months go by. But I highly doubt you can teach once or twice a year and get good at it.

Something it took us a while to get comfortable with is what Evan calls ‘mistaking’. If you’re a master coder, you might not make too many mistakes (but your expertise means you will have other problems). If you’re not a master (join the club), you will make a lot of mistakes. Embracing everything as a learning opportunity is less awkward for you, and for the students — dealing with mistakes is a core competency for all programmers.

Reflective practice means asking for, and then acting on, student feedback — every day. We ask students to write it on sticky notes. Reading these back to the class the next morning is a good way to really read it. One of the many benefits of ‘never teach alone’ is always having someone to give you feedback from another teacher’s perspective too. Multi-day courses let us improve in real time, which is good for us and for the students.

Some other advice:

  • Keep the student:instructor ratio to no more than ten; seven or eight is better.

  • Take a packet of orange and a packet of green Post-It notes. Use them for names, as ‘help me’ flags, and for feedback.

  • When teaching programming, the more live coding — from scratch — you can do, the better. While you code, narrate your thought process. This way, students are able to make conections between ideas, code, and mistakes.

  • To explain concepts, draw on a whiteboard. Avoid slides whenever possible.

  • Our co-teacher John Leeman likes to say, “I just showed you something new, what questions do you have?” This beats “Any questions?” for opening the door to engagement.

  • “No-one left behind” is a nice idea, but it’s not always practical. If students can’t devote 100% to the class and then struggle because of it, you owe it to the the others to politely suggest they pick the class up again next time.

  • Devote some time to the practical application of the skills you’re teaching, preferably in areas of the participants’ own choosing. In our 5-day class, we devote a whole day to getting students started on their own projects.

  • Don’t underestimate the importance of a nice space, natural light, good food, and frequent breaks.

  • Recognize everyone’s achievement with a small gift at the end of the class.

  • Learning is hard work. Finish early every day.

Give it a try

If you’re interested in help people learn to code, the most obvious way to start is to offer to assist or co-teach in someone else’s class. Or simply start small, offering a half-day session to a few co-workers. Even if you only recently got started yourself, they’ll appreciate the helping hand. If you’re feeling really confident, or have been coding for a year or two at least, try something bolder — maybe offer a one-day class at a meeting or conference. You will find plenty of interest.

There are few better ways to improve your own skills than to teach. And the feeling of helping people develop a valuable skill is addictive. If you give it a try, let us know how you get on!

Feel superhuman: learning and teaching geocomputing

Diego teaching in Houston in 2018.

Diego teaching in Houston in 2018.

It’s five years since we started teaching Python to geoscientists. To be honest, it might have been premature. At the time, Evan and I were maybe only two years into serious, daily use of Python. But the first class, at the Atlantic Geological Society’s annual meeting in February 2014, was free so the pressure was not too high. And it turns out that only being a step or two ahead of your students can be an advantage. Your ‘expert blind spot’ is partially sighted not completely blind, because you can clearly remember being a noob.

Being a noob is a weird, sometimes very uncomfortable, even scary, feeling for some people. Many of us are used to feeling like experts, at least some of the time. Happy, feeling like a noob is a core competency in programming. Learning new things is a more or less hourly experience for coders. Even a mature language like Python evolves fast enough that it’s hard to keep up. Instead of feeling threatened or exhausted by this, I think the best strategy is to enjoy it. You’ll never be done, there are (way) more questions than answers, and you can learn forever!

One of the bootcamp groups at the Copenhagen hackathon in 2018

One of the bootcamp groups at the Copenhagen hackathon in 2018

This week we’re teaching our 40th course. Last year alone we gave digital superpowers to 325 people, mostly geoscientists, Not all of them learned to code, as such — some people already could, and some found out theydidn’t like it… coding really isn’t for everyone. But I think all of them learned something new about technology, and how it can serve them and their science. I hope all of them look at spreadsheets, and Petrel, and websites differently now. I think most of them want, at some point, to learn more. And everyone is excited about machine learning.

The expanding community of quantitative earth scientists

This year we’ve already spent 50 days teaching, and taught 174 people. Imagine that! I get emotional when I think about what these hundreds of new digital geoscientists and engineers will go and do with their new skills. I get really excited when I see what they are already doing — when they come to hackathons, send us screenshots, or write papers with beautiful figures. If the joy of sharing code and collaborating with peers has also rubbed off on them, there’s no telling where it could lead.

Matt teaching in Aberdeen in October 2018

Matt teaching in Aberdeen in October 2018

The last nine months or so have been an adventure. Teaching is not supposed to be what Agile is about. We’re a consulting company, a technology company. But for now we’re mostly a training company — it’s where we’re needed. And it makes sense... Programming is fundamentally about knowledge sharing. Teaching is about helping, collaborating. It’s perfect for us.

Besides, it’s a privilege and a thrill to meet all these fantastically smart, motivated people and to hear about their projects and their plans. Sometimes I wish it didn’t mean leaving my family in Nova Scotia and flying to Houston and London and Kuala Lumpur and Kalamazoo… but mostly I wish we could do more of it. Especially when we get comments like these:

Given how ‘dry’ programming can be, it was DYNAMIC.”
”Excellent teachers with geoscience background.”
”Great instructors, so so approachable, even for newbies like me.”
”Great course [...] Made me realize what could be done in a short time.”
”My only regret was not taking a class like this sooner.”
”Very positive, feel superhuman.

How many times have you felt superhuman at work recently?

The courses we teach are evolving and expanding in scope. But they all come back to the same thing: growing digital skills in our profession. This is critical because using computers for earth science is really hard. Why? The earth is weird. We’ve spent hundreds of years honing conceptual models, understanding deep time, and figuring out complex spatial relationships.

If data science eats the subsurface without us, we’re all going to get indigestion. Society needs to better understand the earth — for all sorts of reasons — and it’s our duty to build and adopt the most powerful analytical tools available so that we can help.


Learning resources

If you can’t wait to get started, here are some suggestions:

Classroom courses are a big investment in dollars and time, but they can get you a long way really quickly. Our courses are built especially for subsurface scientists and engineers. As far as I know, they are the only ones of their kind. If you think you’d like to take one, talk to us, or look out for a public course. You can find out more or sign up for email alerts here >> https://agilescientific.com/training/

Last thing: I suggest avoiding DataCamp, because of sexual misconduct by an executive, compounded by total inaction, dishonest obfuscation, and basically failing spectacularly. Even their own trainers have boycotted them. Steer clear.

How good is what?

Geology is a descriptive science, which is to say, geologists are label-makers. We record observations by assigning labels to data. Labels can either be numbers or they can be words. As such, of the numerous tasks that machine learning is fit for attacking, supervised classification problems are perhaps the most accessible – the most intuitive – for geoscientists. Take data that already has labels. Build a model that learns the relationships between the data and labels. Use that model to make labels for new data. The concept is the same whether a geologist or an algorithm is doing it, and in both cases we want to test how well our classifier is at doing its label-making.

2d_2class_classifier_left.png

Say we have a classifier that will tell us whether a given combination of rock properties is either a dolomite (purple) or a sandstone (orange). Our classifier could be a person named Sally, who has seen a lot of rocks, or it could be a statistical model trained on a lot of rocks (e.g. this one on the right). For the sake of illustration, say we only have two tools to measure our rocks – that will make visualizing things easier. Maybe we have the gamma-ray tool that measures natural radioactivity, and the density tool that measures bulk density. Give these two measurements to our classifier, and they return to you a label. 

How good is my classifier?

Once you've trained your classifier – you've done the machine learning and all that – you've got yourself an automatic label maker. But that's not even the best part. The best part is that we get to analyze our system and get a handle on how good we can expect our predictions to be. We do this by seeing if the classifier returns the correct labels for samples that it has never seen before, using a dataset for which we know the labels. This dataset is called validation data.

Using the validation data, we can generate a suite of statistical scores to tell us unambiguously how this particular classifier is performing. In scikit-learn, this information compiled into a so-called classification report, and it’s available to you with a few simple lines of code. It’s a window into the behaviour of the classifier that warrants deeper inquiry.

To describe various elements in a classification report, it will be helpful to refer to some validation data:

Our Two-class Classifier (left) has not seen the Validation Data (middle). We can calculate a classification report by Analyzing the intersection of the two (right).

Our Two-class Classifier (left) has not seen the Validation Data (middle). We can calculate a classification report by Analyzing the intersection of the two (right).

Accuracy is not enough

When people straight up ask about a model’s accuracy, it could be that they aren't thinking deeply enough about the performance of the classifier. Accuracy is a measure of the entire classifier. It tells us nothing about how well we are doing with one class compared to another, but there are other metrics that tell us this:

metric_definitions2.png

Support — how many instances there were of that label in the validation set.

Precision — the fraction of correct predictions for a given label. Also known as positive predictive value.

Recall — the proportion of the class that we correctly predicted. Also known as sensitivity.

F1 score — the harmonic mean of precision and recall. It's a combined metric for each class.

Accuracy – the total fraction of correct predictions for all classes. You can calculate this for each class, but it will be the same value for each of the class.   

DIY classification report

If you're like me and you find the grammar of true positives and false negatives confusing, it might help to to treat each class within the classifier as its own mini diagnostic test, and build up data for the classification report row by row. Then it's as simple as counting hits and misses from the validation data and computing some fractions. Inspired by this diagram on the Wikipedia page for the F1 score, I've given both text and pictorial versions of the equations:

dolomite_and_classifier_report_sheet.png

Have a go at filling in the scores for the two classes above. After that, fill in your answers into your own hand-drawn version of the empty table below. Notice that there is only a single score for accuracy for the entire classifier, and that there may be a richer story between the various other scores in the table. Do you want to optimize accuracy overall? Or perhaps you care about maximizing recall in one class above all else? What matters most to you? Should you penalize some mistakes stronger than others?

clf_report.png

When data sets get larger – by either increasing the number of samples, or increasing the dimensionality of the data – even though this scoring-by-hand technique becomes impractical, the implementation stays the same. In classification problems that have more than two classes we can add in a confusion matrix to our reporting, which is something that deserves a whole other post. 

Upon finishing logging a slab of core, if you were to ask Sally the stratigrapher, "How accurate are your facies?", she may dismiss your inquiry outright, or maybe point to some samples she's not completely confident in. Or she might tell you that she was extra diligent in the transition zones, or point to regions where this is very sandy sand, or this is very hydrothermally altered. Sadly, we in geoscience – emphasis on the science – seldom take the extra steps to test and report our own performance. But we totally could.

The ANSWERS. Upside Down. To two Decimal places.

The ANSWERS. Upside Down. To two Decimal places.